Take The Dante Advantage
Six Ways To Transform Your Studio Workflow.
So you've bought a Focusrite Red interface – congrats! It's taken pride of place in your studio and you're over the moon with its rock-bottom latency and dynamic sound. Right now, you're happy using the DigiLink and Thunderbolt ports to interface with your various DAWs, after all it's the first time you've been able to use the same interface for Pro Tools | HD and Ableton Live.
Or maybe you're using a Red interface on stage for playback with your band. You bought it because of the quality of the conversion and the low latency, but you've noticed that the stage crew is using a Dante network for the monitor and FOH mixing. Well, you have Dante too, and it's ready and waiting to be used. This piece suggests ways to inject the Dante advantage into your workflow, and provide some out-of-the-box ideas that you maybe never thought possible.
1. Expand Your Foldback Capabilities
In conventional interface systems, creating custom mixes for your performers either requires a dedicated headphone distribution system, costing about $1000 per mix, or a large-format mixing console with enough aux channels or mix groups for each of your performers — also a significant expense. Add to this the need for headphone amps and the cable required to route all your signals, and you were faced with a clunky, complicated system prone to technical problems. An alternative is to mix all your headphones sends in the interface's control software, but this process will eat into your engineer's setup time, and consume analogue outputs at a rate of two per performer – let alone the unacceptable latency that some older interfaces would introduce.
But with Dante connectivity, a more elegant approach is possible. The Red 4Pre and Red 8Pre each have a 32 I/O Dante interface, which can be used to route audio from your DAW to a Dante-enable device. One such device is Focusrite's RedNet AM2, a two-channel Dante receiver with a headphone amplifier and line-level outputs, which fits in the palm of your hand. You can equip your studio with up to 16 stereo foldback stations, for the reasonable sum of $400 per mix. This functionality is ready and waiting, needs no upgrades or add-ons, and is remarkably simple to set up. What's more, the AM2 is one of the few Dante products that supports daisy-chained Ethernet connections, so you don't even need a network switch!
You can create up to eight different latency-free mixes using Focusrite Control, and even have your performers adjust their own mix on their iOS device using the Focusrite app!
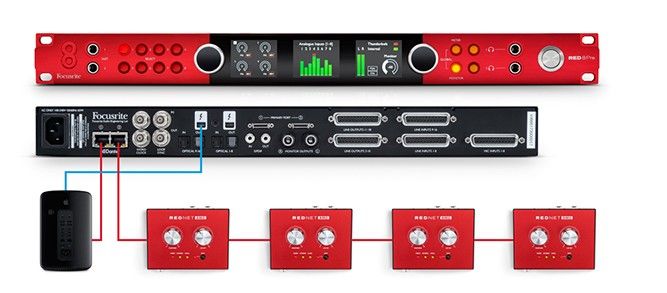
Adding Focusrite RedNet AM2s via Dante is a cost-effective way to provide convenient foldback to performers.
2. Activate Every Corner Of Your Facility For Recording
One of the runaway benefits of audio-over-IP is that you can easily and affordably expand your system. Let's say you have a production room in a studio complex where lots of other fellow music makers work. You may have a couple of racks of outboard gear, and enough space to record a couple of vocalists or a horn section, but not much more. Your friend in another studio in the building has a live room and there's that concrete stairwell at the end of the corridor with a crazy tank-like reverb. Ever dreamed of hooking it all up?
With a Focusrite Red 4Pre or 8Pre in your studio, not only would you have great-sounding conversion and class-leading mic pres, you also have a 32 I/O Dante interface built in. With Dante, you can configure the connected devices any way you like, so all 32 channels need not come from the same physical location (unlike MADI or ADAT, for example). So you could have 16 channels of Dante-enabled mic pres for tracking a string quartet in a room down the hall, four channels for a stereo reverb send/return in the stairway, and a stack of independent headphone stations for the performers. (See point 1, above.)
You will need additional interfaces, such as those in the Focustrite RedNet range. But thanks to Dante's semi-open architecture, there are over 1000 devices to choose from, from digital audio recorders to amplifiers — even wireless microphones.
This workflow was technically possible previous systems, albeit with significant analogue routing, distribution and outboard equipment required. With Dante, you can easily connect the various parts of the building together, without any of the hassle or signal degradation associated with running multicore cable. All you need is some run-of-the-mill network cable (Cat-5e or Cat-6) and a network switch — and some imagination.
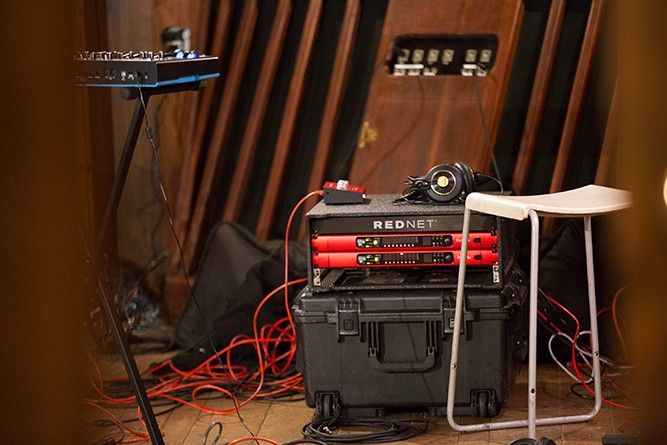
Portable racks of Dante devices — such as these two Focusrite RedNet MP8R mic preamps — can be easily located practically anywhere. The Focusrite AM2 (sitting atop the rack) provides a dedicated headphone mix for the performer.
3. Make Your Stage Show Sound Great & Integrate Effortlessly
Computers play a major role in live shows, thanks to increased reliability and performance of DAWs and interfaces. Many concerts contain an element of playback 'from track', to help keep the band in sync, beef up the sound and provide that 'album vibe'. In many cases, playback will be triggered by the musical director, who's often a member of the band. In more technically advanced stage setups, multiple band members feed audio into a single DAW for effects processing and suchlike.
The Focusrite Red 8Pre is an excellent choice for live applications, thanks to its high-quality 16-in, 18-out analogue capabilities, coupled with super-low latency over Thunderbolt. But what makes the Red interfaces even more desirable on stage is their Dante connectivity.
Dante has been adopted widely in live sound, due to its plug-and-play nature, the sheer number of Dante devices available, and the lack of signal degradation over long distances. This means that many live devices — mixing consoles in particular — are already Dante-equipped.
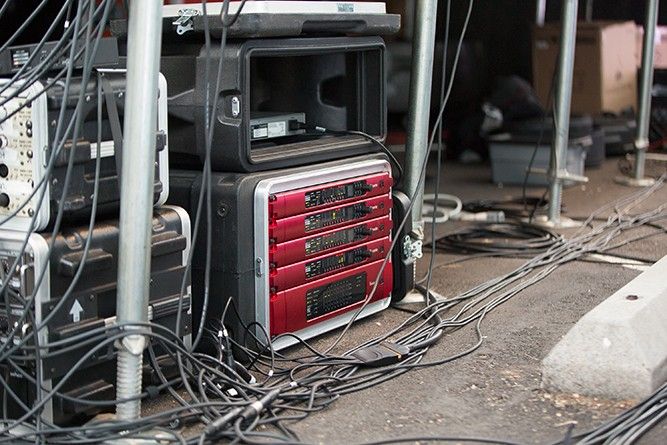
So instead of using the analogue outputs of an interface to send the band's playback to the monitor mixer, with a split to front-of-house, simply connect via Dante, and your outputs will appear on the network for both the Monitor and FOH engineers to grab. They can assign and mix your output levels however they want, independently of each other, and even route the unmixed tracks to a recording device.
It really is a win/win, whichever way you look at it: Assuming you already have a Dante setup on stage your gear outlay is the price of a network switch and some dirt-cheap cables, instead of multiple DIs and several kilograms of analogue multicore. Your sound remains in the digital domain throughout the mixing system, so it sounds as good as possible. You save valuable time during soundcheck, and routings can be saved in presets that can be recalled in an instant. It's also one less roadcase to load on to the truck at the end of the show. Oh, did we say it can be remote controlled? Tell your live engineer — you'll make their day!
4. Make Multi-Channel Backups Of Everything You Record
Recording on computer is as stable as it has ever been; the old days of DAWs freezing and requiring a full restart are thankfully becoming a thing of the past. But that's not to say that your software might not develop a bug half-way through a vital multi-track recording, or your hard drive platter may spin its final revolution just as the Javanese Gamelan orchestra you hired starts to play.
Regardless of whether you have audio-over-IP capabilities, it's good practice to use a backup recorder, in case the aforementioned nightmares become reality. In the analogue domain, that would involve a cumbersome and costly analogue split, which would take up space and compromise your signal quality.
With the Focusrite Red interfaces, you have 32 inputs and outputs to a Dante network, as well as a powerful FPGA-based routing matrix, which operates wether or not a computer is connected. So while Ableton, Logic or even Pro Tools | HD is running as your main DAW, recording multiple analogue and digital inputs — including those from ADAT and S/PDIF — those signals can be simultaneously routed via Focusrite Control to an external, Dante-enabled multi-channel recorder, such as a JoeCo BlackBox Recorder. Though the cable would cost you just $3, the recording device itself is fairly expensive. But what price do you place on personal peace of mind, and a client's extra confidence that you're always ready to hit record?
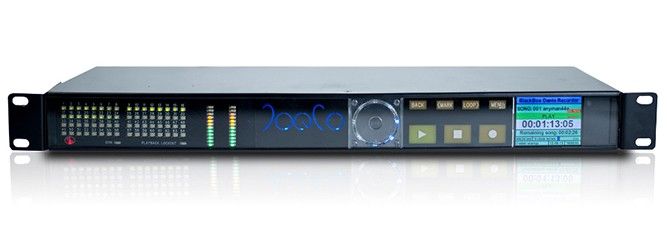
JoeCo's BlackBox Recorder is available with a Dante input, making backup recordings from a Dante network painless.
5. Connect An Analogue Mixer To Perform Live Mixdowns
In recent years (decades, you could say), large analogue mixers have become less and less common. Some facilities relegated their consoles to the humble role of volume-control-and-talkback device, while others swapped big mixers for nimble and less needy DAW controllers.
In some cases, the deal-breaker was needing to have to have the old analogue gear connected to the DAW and interface permanently. Maybe it was connected once, but the studio needed more space on the patchbay for a new outboard rack, so it was unplugged. Perhaps the space the mixer occupied was better used for additional gear or a vocal booth.
But we know there's really nothing like mixing on a proper console; that age-old discipline of grouping channels together, taping adjacent faders together with a pencil to do smooth multi-slider fades, performing live mutes, and EQing things on the fly — sometimes with a couple of friends involved to engage effects chains at exactly the right time.
Whatever the reason for demoting your old mixer in the past, maybe it's time to reconsider the live mixdown capabilities of your rig. With the flexibility afforded by the Red interfaces and their Dante connectivity, you can reintegrate your mixing console without affecting your day-to-day workflow. Sure, there will be a cost — you'll need a network switch and some D-A and A-D converters, such as a RedNet A16R or two. But if you thought this functionality was firmly out of reach, maybe it's time to re-evaluate.
Why not, dust off your old 8-buss, or grab that pawn shop steal, and bring the joy of hands-on mixing (back) to your life?!
6. Add An Analogue Tape Machine To Your DAW Workflow
Analogue tape machines became a costly creative choice, rather than a recording necessity, a long time ago. As the computer revolution gripped the recording industry, tape machines were superseded by Digital Audio Workstations (DAWs), and subsequently pushed farther into the back of the storeroom?—?if they weren't sold or scrapped completely. But the sound of tape is still considered essential for certain musical styles?—?especially rock 'n roll?—?where tape saturation helped to define the genre.
Now, we know that a multi-track tape machine is an expensive investment, and even if you can get your hands on one, keeping it running won't be plain sailing. But at least we can assure you that integrating it via Dante into your existing DAW workflow will be an absolute cinch.
With a Red 8Pre as your main interface and your existing equipment connected via the analogue, ADAT and S/PDIF connections, you have 32 additional channels in and out through Dante. So if you have a 16-track tape machine, connected via a RedNet A16R A-D/D-A converter, you could send audio to and from your tape machine and still have half your Dante channels spare. Upgrade to a 24-track machine and you'll need to add eight more channels of Dante A-D and D-A, but you'll still have eight Dante channels left for something else.
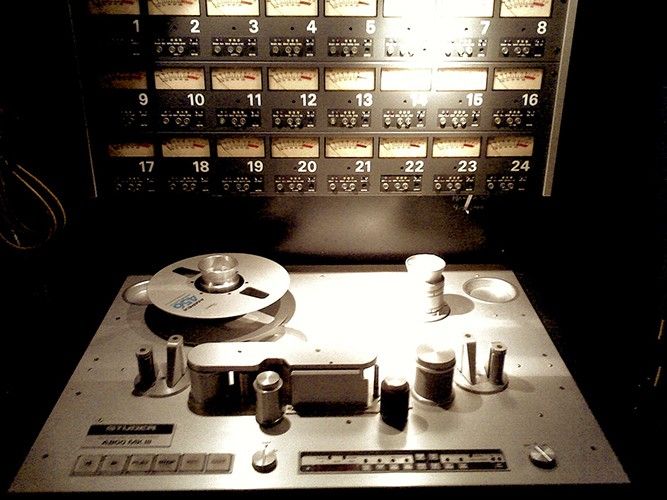
A Studer A800 MkIII: the dream of many recording engineers. Buying one will set you back several thousand dollars, and you'll need to purchase some A-D/D-A converters. But once it's connected, it could become part of your daily workflow.

